Pages

Bottling Garden Beetroot

My vegetable garden only produced enough beetroot for one jar. Maybe next year I'll grow more or harvest more!

Bottling Recipe:
1/2 cup sugar (white)
1 cup vinegar (I use white)
1 cup water
Salt & pepper to taste

To preserve beetroot you follow all the usual preserving methods such as sterilizing the jars etc. There is plenty of information on the Internet for different methods of bottling (canning) beetroot...

I just heated up the vinegar/sugar/water mix and added it to the cooked beetroot (chopped). I will be eating this quicky (I love beetroot) so I haven't worried too much about my sealing the jar. This glass jar is getting old and I need to buy a new seal for it.

My favourite way of eating beetroot is on melted cheese on toast. I just slice the cooked beetroot onto the melted cheese and add plenty of white pepper...Whats your favourite way of eating beetroot?

Love beetroot especially home
preserved

Pickling Green Tomatoes

This is an old recipe given to me by a friend many years ago on how to make Green Tomato and Pineapple Pickle. A little time consuming, only because you have to sprinkle the green tomatoes with salt for two hours...I left this batch overnight though and it was fine. Luckily I've been saving 'Craigs' marmalade jars so I didn't have to buy any glass jars this time.

Green Tomato and Pineapple Pickle
4 1/2lb Green tomatoes
2 1/4lb Onions
3 Cups sugar (white)
1 1/2 TB Turmeric, Curry, Mustard
1/2 Cup flour
2TB Golden syrup
Vinegar (white)
450g Pineapple (large tin)

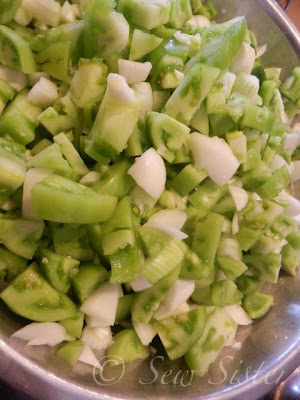
* Chop green tomatoes and onions and put into a bowl
* Sprinkle over 2TB of common salt (plain)
* Leave for 2 hours and stir frequently
* Next pour off the liquid and put into pot
* Barely cover the tomatoes and onions with vinegar
* Add 3 cups of sugar and simmer
* Add 1 large tin of pineapple pieces or crushed plus 2TB Golden Syrup
* Mix in small bowl, 1 1/2 TB mustard, curry, turmeric, 1/2 cup of flour
*  Add a little liquid to make a smooth flour/spice paste  
* Then add to the pan and boil 10 minutes.
* Bottle and seal when cold

Note:
I think large cans of pineapple are now 425g. I have no time stated for simmering, I simmer my tomatoes and onions until they are soft. I like to use white onions too.


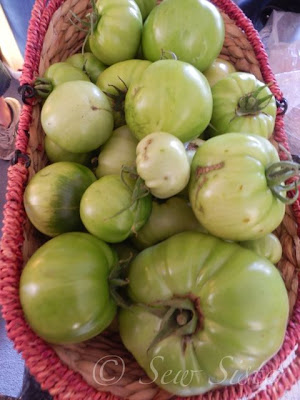
A mixture of tomatoes, Taupo & Beefsteak
The whole house smelled of pickle
actually it was quiet a refreshing small
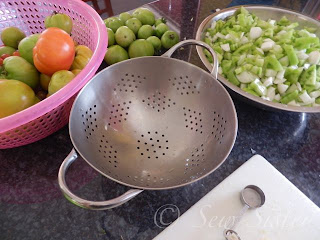
Drain the soaked Green tomatoes and onions
and put it all in the pot
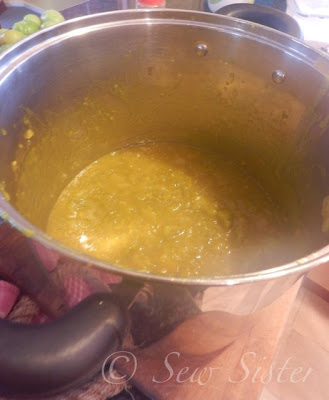
Cook for until all  the tomatos and
onions are soft and the mixture has
 thickened. Now it's ready to bottle...
Hmm...I always make a mess when
pouring hot pickle into the hot sterilized jars 
This year it doesn't look so chunky..
I used crushed pineapple instead of pieces
It's  been cooked a lot longer too...
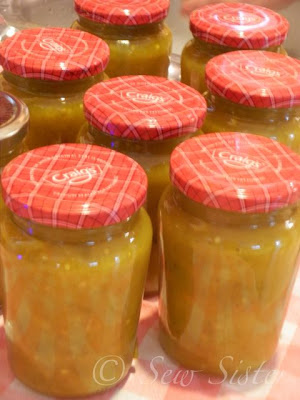
All bottled and ready to label...It's so
nice to use up all my homegrown
tomatoes....This year was a big crop
about 30kg!


Nautical Swap

Here is my lovely nautical basket from SewExhausted. This made it's way to New Zealand from California full of many wonderful things...Buttons, a nice pincushion and much more. Such a surprise to get lip gloss, Anyway I am never without lipstick, so I just love this gloss. This is very special thank-you to you girls! Happy Sewing...


House of Pinheiro: International Craft Swap

This is my effort for the 'International Craft Swap'  featuring the colours, blue, white and red.

The wine bottle cover is over in California now, made for Kerrielee at Sew Exhausted. I used a large sized empty wine bottle (on the right in the pic) to draft my pattern from. No...I didn't drink the wine it was corked (2004) and it all went down the drain.

I was happily sewing away and I was almost finished when I decided to go outside for a 'breath of fresh air'.  I was so busy taking a photo of the wine bottle when 'someone' who was sitting outside doing school stuff nearby piped up and said, "You know that's a large wine bottle your using there". "No it isn't" I replied and then rushed off to compare the bottle to another wine bottle. Sure enough she was right!

Here was me thinking that wine bottles must be smaller overseas. Because all the wine bottle cover patterns I  found on the Internet were way too small for the size of my wine bottle. It's a long time since I've drunk wine, I have no idea about the bottle size...

I found an easy tutorial over at sewplicity and used this pattern as a guide also.  Though I have added a different style of tie for a more nautical look, and my turn over at the top is much shorter in length too.

A wine bottle cover for a big bottle of wine...
'Wear me whatever way you like'

Japanese Knot Bag

 I made the 'Japanese Knot Bag' out of an old skirt made of a type of Chinese brocade fabric. The skirt was really lovely but I made the short side, not slanting down far too short. It fitted very tight too so I threw it in the disaster rag bag...It sat there for years until today when I re-hashed it into a Japanese knot bag...Here is the pattern.


While I was Blogging...

I was so busy blogging that I burnt my pickle, I plain forgot I'd put the pickle on to re-bottle because the lids didn't seal. I don't have to worry about that now though. 'Burning and Blogging' I'm starting a new trend...

Lucky I still have a kitchen and it was two jars
 of pickle. The rest are all sealed well
What a mess lucky it's not an
expensive pot!
 These lids are not sealing which is so annoying.
They are now scratched from my first attempt. Not
a very good fit I suspect...

Shoes and Sewing Machines

I was going to buy some winter shoes, it's getting colder now...But in a moment of madness my shoe purchase ended up becoming a sewing machine purchase. The joys of getting older, I change my mind on a whim. Do I really need another sewing machine? No I don't...

In fact for my $100.00 or so sewing machine purchase could have bought me some exciting new pieces of fabric...No more stash busting, I'm really over my stash I need new fabric to keep me motivated. Buying fabric instead of shoes would have been okay. You can wear fabric but you can't wear a sewing machine...

'Just one look that's all it took' (just like the song) and any common sense I had was gone. I ended up buying a a vintage Bernina Record 730. The first sewing machine I ever owned which I traded in on a Bernettee for my daughter. My excuse for buying the Bernina 730 was that my daughter is not allowed to sew on my sewing machines. So I had to buy her an old one for her to use because she no longer has the Bernette.

Well the idea of giving it to her has now gone 'right out the window'. This Bernina Record 730 runs better than my Bernina 801 so she can't have it for now...She can have it when I'm over my Bernina 730 obsession...

Once that foot pedal goes it will be pretty much a lost cause as a working sewing machine. The sewing machine will only become an object to admire...so I might as well make the most of my time with this old Bernina.

Because the sewing machine can be changed to a slower speed, I tried to teach my my grandson to sew a seam. I must admit he was a little bit scared, but it's a good skill for him to learn. He might have to hem his own pants one day just like my dad did...

Nostalgia and total impulse buying is what swayed me to buy this sewing machine. Things from my younger days I want them all back....When my son saw it he said, "Haven't I seen this machine somewhere before?"

Yes when he was about three!


Here he is 'Bernie the Bernina' some scratches
 in the front, otherwise perfect...
Plug number: 011-1672
Three way plug one hole is blocked. Was
it made like this? I don't know...
The  original old green foot pedal
Number on foot pedal:  Typ: FT6-2A6
110-250V
Bernina Record 730 fancy stitches
I made a felt circle for the cotton reel
to sit on
Threaded up ready to make table mats  

Table Mats and a Drafty Door

Sunny table mats for winter...I love yellow so I can live with it easily though I don't wear it very much...These placemats were pretty easy to make. But washing them will become a task...If they end up on the wrong washing machine cycle they will most probably fall apart. They'll all become a frayed tangled mess because of the type of fabric I've used...I'll have to be so careful!

Table Mats:
You'll need scissors, fabric, contrast cotton, a marking pen, an old place mat for sizing and a sewing machine to make these table mats...

* Choose a heavy weight cotton fabric.
* You will need a fabric that frays easily
* Divide the fabric into rectangles
* Then mark and cut out your rectangle place mats
* Zig zag stitch 3/4 to 1" inside the rectangle on all sides
* Next unravel the weave until it reaches the stitching (frayed edge)
* Press and use...

Note:
You can turn and stitch short ends for a different look. I wish I had done this as my short ends didn't fray that well... I got four x-large placemats out of a metre of upholstery fabric.

From the left over scraps there was enough to make a draft stopper (sewn with the raw frayed edges showing). Next I filled the draft stopper with kitty litter...I hope that cat doesn't think it's a dirt box!


All sewn using a Bernina Record 730. How did I
manage that? Well that's another post!

Easter Geranium Dresses

Finally, I have finished the girls two dresses. I'm so pleased that they are a perfect fit and I only had to shorten the length on the smaller one...I used the 'Geranium Dress' pattern made by rae and I really loved sewing from this pattern. The 'Geranium Dress' is a mix n match pattern, you can chose which ever style you want to make. The sizing of the pattern ranges from 0-5years and I used a medium weight patterned cotton fabric for the dresses.

Although I had enough fabric to make two dresses in the same style, I chose to make the smaller one different. I had visions of myself turning into my 'granny' and dressing the girls alike all the time....So I thought maybe this time they should have their own individual look...

The deer costume I made earlier was quickly changed into a rabbit costume by adding a painted mask and a bow...The bigger cousin wanted to surprise the little girls and it was his idea to become a rabbit. His Gran, being the sewer had to oblige...I didn't have much time to sort it all this out and I would have made a much better bow for 'bunny' to wear than the scrap of purple ribbon I found.

Unfortunately 'bunny' on his debut outing slipped in doggy doo. I swear that dog did all that on purpose. How can a dog do four poops first thing in the morning? We had cleaned up the garden the night before...Anyway after a false start the children all had a wonderful time watching the bunny bounce round the garden...


Geranium dress and the easter egg hunt...a few
tomatoes were found too!
The cat helped hunt for eggs too...
'Come on cat', she's saying....Cat Nip beckoned, it's much
more fun than looking for Easter Eggs!


Yellow Chicks for Easter

These Yellow Easter Chicks are pretty easy to make. This was a last minute effort once I realized I had I all the ingredients in the pantry. Do you get a last burst of creativity? My best ideas seem to be always at the last minute...

The exact recipe with all the measurements can be found in Easter with Nestle Baking in the Woman's Day Thursday March 21st, 2013. magazine, New Zealand. As far as I know they haven't put this recipe online.

If you are unable to source the recipe and want to make these cute chicks...You can improvise and make up your own recipe measurements. You only need one packet of plain sweet biscuits (like Marie, Super wine, Vanilla Wine). Next you crush the biscuits  in the food processor until they turn into fine biscuit crumbs. Just like for making a cheese cake base...


You need yellow food colouring to colour
the coconut
Use a sealed plastic bag to colour
the coconut you are using to coat the chicks.
 Prepare this first. You want the food colouring
to soak into the shredded coconut.... 
Add one can of condensed milk to
 to one packet of crushed sweet biscuits
Mix  together biscuit crumbs, condensed milk
and some shredded un-coloured coconut to
make a good consistency to mould into shape

Roll  the mixture into truffle sized balls, some
a larger size for the bottom of the chicken.
Form a smaller size for the head of the chick.
 Stick them together...
I used Nestles Milk chocolate dots for the eyes
Then use almonds for the chicks beak...
Mine were roasted, unsalted almonds
Dunk the chickens into  the pre-coloured coconut.
Wet or spray with water the balls if they become
too dry. This helps the  coloured coconut stick
So cute, these were so popular...mine could have
 been a bit more yellow. But it is food colouring
and I didn't want too hypo children. You could
use this concept to make snowmen for
Christmas...

Related Posts Plugin for WordPress, Blogger...